
I earn a small commission from some of the links posted in this t-shirt quilt tutorial and on this website.
This post shares everything I’ve learned about making a t-shirt quilt. It walks you through the basic tips and techniques you need to create a t-shirt quilt from start to finish.
Some of you might be reading this and thinking, “I’ve seen this before…” — and you’re right. I was once a co-author on a blog called Wee Share. My sister-in-love created it and invited me to join a few years later. I originally shared this post there, and it became incredibly popular.
Unfortunately, Wee Share had a major issue with BlueHost, and all of the site’s content was accidentally deleted. It was awful. Since then, I’ve been working to recreate some of the posts that were especially worth bringing back — and this is one of them.
Do you love reading? Check out my 2023 reading recommendation list here.
My husband’s aunt just happened to print my original How to Make a T-Shirt Quilt post so she could easily reference it while quilting — and I am so glad she did! She truly saved the day by sending me a copy of the original post, which made it easy to republish here.
Even though this content was originally shared on a different blog, I want to assure you that it is entirely my own.
I’ve been making t-shirt quilts for several years, and it has become a true passion of mine. I love creating quilts that preserve special memories, milestones, and experiences through meaningful t-shirts. When I first started, I remember wishing someone had clearly broken down the basics for me. That’s why I’m excited to share what I’ve learned and help make the process easier and less overwhelming for beginners.
- Step 1: Pick out a bundle of your favorite t-shirts!
- Step 2: Measure t-shirt logos and sketch a layout!
- Step 3: Plan your Layout
- Step 4: Cut the t-shirts with EXTRA allowance on all sides
- Step 5: Lay out the t-shirts to check for symmetry!
- Step 6: Back the t-shirts!
- Step 7: Trim the t-shirts!
- Step 8: Make the sashing
- Step 9: Piece the quilt top together!
- Step 10: Cut border and add it to the t-shirt quilt!
- Step 11: Make the t-shirt quilt backing!
- Step 12: Make the quilt sandwich
- Step 13: Quilt it together
- Step 14: Trim the t-shirt quilt!
- Step 15: Cut the binding and bind the quilt
- More Quilting Posts to explore:

There are a lot of steps involved in making a t-shirt quilt, and it can feel intimidating at first. This post covers just the first set of tips and tricks you’ll need when creating your very first t-shirt quilt. Everyone has their own process, and not every method will look exactly like mine — and that’s okay. The techniques shared here are simply the approach that works best for me, and I encourage you to find what works best for you too.
Before you begin: I highly recommend pre-washing everything before starting your quilt — except for the batting and thread. This includes t-shirts you may have already washed countless times. Pre-washing helps prevent shrinking, color bleeding, and unexpected issues later on. When it comes to quilting, it’s always better to be safe than sorry!

This particular stack of t-shirts are all from 5K, half marathons, and marathons that I have ran. I didn’t choose a particular color scheme for this t-shirt bundle, I was focused on the type of t-shirt!
Step 1: Pick out a bundle of your favorite t-shirts!
Making your very first t-shirt quilt can be surprisingly emotional. You’re excited to turn your favorite shirts into a memory quilt… but letting them go? That part can be tough! Here are a few things I like to think about when picking which t-shirts to include:
T-Shirt Colors
Multi-color t-shirt quilts are super fun and adorable, but sometimes you might want something a little more uniform in color. Think about the overall look you want—do you want it bright and playful, or more coordinated and cohesive? This is the perfect time to make that decision before you start cutting and sewing!
Your T-Shirt Quilt Layout
Take a close look at each t-shirt logo and the size of your shirts. Here’s a quick tip: smaller shirts mean smaller logos, while larger shirts give you more flexibility with logo sizes when planning your layout. All t-shirts can be used in a memory quilt, but if you have, say, 5 large shirts and 3 extra-small ones, it might be tricky to create a symmetrical pattern. Just something to keep in mind!
Your T-Shirt Quilt Sashing & Border Color
The colors of the t-shirts you choose for your quilt can make a big difference in how your sashing and borders look. Bright, bold colors might call for a more neutral border to balance everything, while softer or matching colors can let you get creative with fun sashing choices. Take a look at the pictures below to see how different color combinations can completely change the look of your quilt!

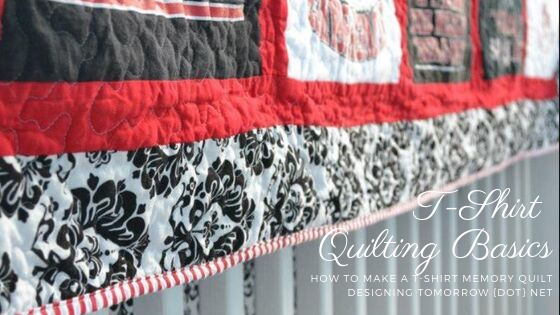
For this t-shirt quilt, I wanted a completely red and black theme. Funny enough, I didn’t have any red t-shirts—but that actually worked out in my favor! I was able to add red sashing between the t-shirts and use red-and-white striped binding to tie the whole look together perfectly.

For this t-shirt quilt I made for my cousin, she had a whole rainbow of t-shirt colors. At first, I wondered how all those bright colors would work together—but it ended up being perfect! She wanted gray sashing between the t-shirts, which helped tie all the different colors together and gave the quilt a balanced, polished look. The gray sashing really made each t-shirt pop while keeping the overall design cohesive.
Frequently Asked Question about T-Shirt Quilt Design
I get asked all the time: “How many t-shirts do I need to make a [size] quilt?” (You know, whatever size goes in that blank.)
Here’s the truth: it totally depends! There’s no magic number. You can make a quilt work with as many—or as few—t-shirts as you have. By playing around with your layout, sashing, borders, and quilt size, you can make it all fit.
That said… I’m a more-is-more kind of quilter. Memory quilts are supposed to be busy, full of color, and packed with memories—so in my book, the more t-shirts, the better!
The secret? Think about what YOU want your quilt to look like. No matter your t-shirt collection, there’s a way to make it work—you just have to decide what matters most to you in the finished quilt.
Step 2: Measure t-shirt logos and sketch a layout!
Please visit this link to find out more about how to measure your t-shirts!
After you choose your t-shirts, sit down and measure each logo. Here is a list of supplies that I use when I do this:
Write down the name of the t-shirt.
Write something down to help you remember which t-shirt each measurement belongs to. When you’re taking the time to measure all the logos, the last thing you want is to mix them up. Label each one so you know exactly which measurement goes with which shirt!
I created a simple Google Document that you’re welcome to download/make a copy of to use.

Make a note about whether that particular logo is from the front or back of that t-shirt.
This step is almost as important as Step #1. Many t-shirts have multiple logos in different spots, so writing down where each logo is located will help you stay organized. You can note things like “pocket,” “right sleeve,” or “left sleeve” to keep track of every logo while measuring.
I also add information about the color of the shirts during this step – it helps me when I’m planning out my layout!
Use your ruler to measure and record the MAXIMUM width and height that you could cut your t-shirt logos
For this step, you want to keep your logo centered when measuring. For example, if the top of the logo is 4 inches from the collar, make sure the bottom is also measured 4 inches from the base. If you just measure the t-shirt without thinking about centering, your logo could end up off-center and lopsided. (Maybe you like that look, which is fine, you do you boo!)
Measure carefully while keeping the logo in the middle, and don’t forget to account for seam allowance for later!

Use your ruler to measure and record the MINIMUM width and height that you could cut your t-shirt logos
When measuring, make sure to give each logo at least 1 inch of space on all sides. Don’t just measure the logo by itself—if you do, you’ll end up sewing right on top of it!
As you measure, highlight the logos that are most important to include in your memory quilt. I like to use a highlighter for the must-have logos and leave the optional ones unmarked. This way, I can add extra logos if there’s space, while making sure the most important ones are always included.
Step 3: Plan your Layout
Please visit this post to find out, in more detail, how to plan a t-shirt quilt layout!
Write down what you want each t-shirt to end up measuring in the quilt
TThis step comes after you’ve decided on your layout, so make sure to write everything down! Without your final t-shirt measurements, it’s easy to get confused in the later steps.
Once you’ve measured all your logos, look at your t-shirts and decide on a common measurement for them. Which measurements you choose completely depends on the look you want for your quilt. I’ve made perfectly symmetrical quilts, rectangular t-shirt quilts, and even fun, mismatched quilts with all different sizes—it’s totally up to you! There are some photo examples below.
Symmetrical T-Shirt Quilt:
In this type of quilt, all the t-shirts are the same width and height, and everything is evenly spaced on all sides. This creates a clean, balanced, and uniform look that feels very orderly. Symmetrical quilts are great if you want a classic, polished style where each t-shirt gets equal attention.

Rectangular T-Shirt Quilt:
In this quilt style, all the t-shirts are the same width, but each one has a different height. This creates a more casual, relaxed look while still keeping the quilt structured and rectangular. It’s a great option if you want some variety in your quilt without it looking completely random—each shirt stands out on its own, but the overall shape stays neat.

Crazy mismatched sized t-shirt quilt:
This quilt includes all sorts of t-shirt sizes. I did this mainly to make room for the huge yellow t-shirt in the top right corner while also fitting the small logos on the right side.
These days — I couldn’t survive quilting without my EQ7 software to lay out my quilt design and tweak all my projects. However, there was a time that I did not have EQ7. If this is you, you can simply sketch with pencil and paper! I absolutely love my EQ7, but sometimes I enjoy the creative simplicity of just sketching the pattern out by hand!
Step 4: Cut the t-shirts with EXTRA allowance on all sides
Start by taking scissors and cutting along the sides of your t-shirt, the sleeves, and the neckline—basically, take the shirt apart. Only cut as much as you need to separate the pieces. I say “bare minimum” because you don’t want to cut too much and end up with not enough fabric for your quilt.
Next, grab your rotary cutter to cut your t-shirts to size. Whatever size you’ve decided for each t-shirt, I always add an extra inch to all measurements. Why? This gives you some wiggle room for mistakes. Adding that extra inch ensures that even if you slip up, you won’t ruin the whole quilt!
When I am disassembling my t-shirts, I use a high quality fabric cutting scissor. Every other time I’m cutting, I use a rotary cutter, cutting mat, and a ruler! It makes it precise and perfect!
Step 5: Lay out the t-shirts to check for symmetry!
After cutting my shirts—remembering to add an extra inch to all measurements—I lay out the t-shirt pieces on the floor in the order I want them to appear in the quilt. I place all the t-shirts right next to each other, and at this point, don’t worry about the sashing. As long as your sashing is the same size throughout, it will just make your quilt a bit bigger in the end.

This is also the point where having your t-shirt measurements handy is super important. You can refer back to them if you need to trim any pieces to make the columns line up perfectly!
Step 6: Back the t-shirts!
To me, backing the t-shirts is one of the very most important parts of making a clean and beautiful t-shirt quilt. Take the time (and money) to purchase high quality backing. It will make YOUR life easier when you’re piecing the quilt together. I use the Pellon 911 Fusible Featherweight backing.

Personally, I buy mine by the bolt. However, you can always buy it by the yard! One thing that I LOVE about using fusible interfacing is that when you’re down to the last couple of pieces of interfacing and you still have more t-shirts to back… you can easily piece scraps together (like a puzzle), iron them down, and voila!

I used my heat press on my latest quilt to put the backing on – it was so quick! However, this is not a requirement. A regular iron is what i’ve always used, and works perfectly fine!
One thing I want to be sure to tell you is to be VERY careful during this step. You want to be 100% sure that you are ironing the interfacing to the BACK of the t-shirts. If you accidentally iron it to the front of the t-shirt… it is irreversible (at least, in my experience).
The first time I backed my t-shirts, I got really concerned. The interfacing DOES make the soft cozy t-shirts VERY stiff. However, I’m here to tell you (from experience) NOT to worry about that. After a few washes (once your quilt is finished), your t-shirts are back to cozy and soft!
Step 7: Trim the t-shirts!
After you’ve backed all your t-shirts, take out your measurement sheet. For each t-shirt, add ½ inch to the width and height—this will be your seam allowance.
Be very careful with this step. You don’t want to accidentally cut off too much fabric. Take your time, think it through, and double-check before you start cutting!
I also highly recommend that you use a rotary cutter, cutting mat, and a ruler to do this step. It will make you want to pull out less hair and get a cleaner cut in the end!
Step 8: Make the sashing
I won’t spend too much time on this step because sashing depends on the design you chose for your quilt. Just make sure to pick a color that complements your t-shirts and the overall look. Your sashing should enhance the t-shirts in your memory quilt, not distract from them!
Step 9: Piece the quilt top together!
Once my t-shirts are trimmed and my sashing is cut, I lay everything out on the floor. Then I start piecing them together, one row or column at a time.
For some quilts, this goes fairly quickly—but for others, it can feel a bit overwhelming. Be patient and work slowly and steadily. If you take it step by step, you will finish!
Step 10: Cut border and add it to the t-shirt quilt!
This is a step where many quilters might disagree with me, but I don’t even choose a border color until my quilt top is almost completely pieced. There are a few reasons for this.
First, what I imagined in my head before piecing the quilt might not actually look right once the top is together.
Second, waiting lets me make sure the color—especially if it’s a solid—matches the quilt perfectly.
Borders make a huge difference every time, so take your time and be sure about your choice before adding it to the quilt!
Step 11: Make the t-shirt quilt backing!
I usually like to match the border on the front of my quilt with the backing. The easiest way to do this is to use the same color or fabric pattern for both. I think it creates a really cohesive, polished look and helps tie the whole quilt together. Plus, it saves time and makes choosing fabrics a lot easier!

Buying enough backing fabric is usually a challenge for me—but never fear! I have a hubby who can calculate exactly how many yards I need, and he’s usually right. One tip: more fabric is always better! It’s much easier to have extra than to run out.
Also, make sure to iron your backing fabric before using it. This helps prevent bubbles when you make your quilt sandwich—and saves you a lot of headaches later!
Step 12: Make the quilt sandwich
There are lots of ways to make a quilt sandwich. I like to use a large space on the floor, but if you have a basting wall you’ve used before, go for it!
I recommend using high-quality cotton batting (like Warm & Natural) and quilt basting spray—these two products make the process so much easier.
Here’s my method:
- Spread the batting out on the floor.
- Lay your backing fabric on top of the batting.
- Fold back half of the backing and spray the exposed batting with basting spray (never spray the fabric!).
- Lay the backing back down and smooth it out from the middle to the edges.
- Repeat the process for the other half of the backing and then for the quilt top.
This method helps keep everything flat, smooth, and ready to quilt.
Step 13: Quilt it together
I’m not going to go into too much detail here because there’s so much to say about quilting your quilt together.
My favorite method for t-shirt quilts is free-motion quilting, but you can also do straight-line quilting if you prefer. Another option is to find someone with a long-arm quilting machine and have them quilt it for you.
The important thing is to choose the method you’re most comfortable with!
Step 14: Trim the t-shirt quilt!
At this step, you want to make sure your quilt is square or rectangular, depending on the size you’re aiming for. You don’t want it to be lopsided or uneven.
Here’s my trimming tip: figure out how wide you want your border to be. Use a ruler to measure the correct length from the seams all around the quilt. Make small marks to guide your rotary cutting ruler, and then trim!
This part can be a little frustrating, especially if you’re a perfectionist like me—you’ll want it to be perfect. Just take a deep breath and be patient. Keep working with the quilt, and it will eventually turn out exactly how you want it.
Step 15: Cut the binding and bind the quilt
This isn’t a tutorial on binding—binding can be tricky and time-consuming. Luckily, there are tons of great tutorials on Pinterest and YouTube if you want to learn the how-to. Maybe one day I’ll post one too!
Even though I’m not covering the how, I do want to talk about the type of binding I use for t-shirt quilts. I love stripes because they add a lot of dimension and visual interest. But you can really use any fabric or pattern you like. I personally go for bold, fun designs.
Here’s why: t-shirt quilts usually focus on the logos, with sashing that’s solid or subtle. The binding is your chance to add some extra personality to the quilt. Don’t hold back—go bold and have fun with it!

After completing the previous 14 steps, trim off any stray threads—I always have a few! Then, throw your quilt in the wash. I highly recommend using Shout Color Catchers and OxyClean the first few times you wash it. This helps prevent colors from bleeding, especially with multicolored t-shirts.
PHEW! That was a long tutorial on making a t-shirt quilt. I hope it helped answer some of your questions about t-shirt quilting! If you still have questions, feel free to comment on this post, and I’ll do my best to help!
More Quilting Posts to explore:

Click here to go to my Amazon storefront.


